
Modern (WordPress) development:
In this tutorial/article i’m going to show you a easy to setup way to start working with Sass and ES6 modules to modernize your WordPress theme development workflow. Both Sass and ES6 Modules can make your developmet a lot easier, help you beter organize your code and in the end keep your code much more maintainable. With this setup you can also start using new javascript features like arrow functions.
In the last section of this article i will give you some examples of using Sass and ES6 modules to show you the benefits of using these techniques.
Now before we can start using Sass and ES6 Modules we need to install something called a assats bundler. Now you may have heard of Webpack before!? Webpack is probably the best assats bundler available, but it comes with so much options that for most developers it’s pretty hard to configure. Luckely there is a solution for that problem.
Laravel Mix by Jeffrey Way “provides a clean, fluent API for defining basic webpack build steps for your applications”. Laravel Mix was originaly created for use within Laravel applications (Hence the name), but it can easily be used for other projects like WordPress themes and plugins.
To install Laravel Mix into your project, you are going to need NPM. NPM is a CLI software Package Manager. You can use it to quickly install all kinds of packages (Javascript libraries, Css frameworks and so on) into your projects.
Ok this all sound like a lot of work. But trust me it’s not as hard as it sounds, and i’m going to show you the simpelest way of doing it.
A minimal WordPress theme:
As a reference to this article, and to help you follow allong i have setup a basic WordPress theme with a working setup of what i’m about to explain. You can download it from this Github repository.
NPM In WordPress theme development:
NPM or Node Package Manager is a widely used command line tool for installing Javascript and Css packages. We are going to install it so we can start using Laravel Mix, and beyond that to install javascript libraries we may need.
Installing Npm:
NPM comes packed with NodeJs. To get started simply download and install the latest version of NodeJs on your maschine and this should automaticaly install NPM as well. (In some rare cases i noticed the need to restart your machine).
To check if NodeJs installed correctly open up your terminal and run the following command:
$ node -v
This should output the NodeJs version number.
To check if NPM installed correctly as well run the following command:
$ npm -v
This should output the NPM version number.
Initialize NPM for your project/theme:
To initalize NPM for your project you could run the $ npm init command inside your theme folder and answer a bunch of questions which at the end creates a file called package.json with the information you entered. But i my experience using NPM in WordPress theme’s you can just as easily create this file your self. So lets go with that option.
Create a file called package.json in the root of your theme folder, and paste the following json code into it:
You can change the value’s to represent your project. Leaving the main, scripts and repository fields as they are. We are going to change the scripts value later for use with Laravel Mix.
The package.json file has many options which you may want to explore, but for now we have the basic setup we need.
Now that we have a package.json file, we have all we need to start using MPM.
Basic NPM commands:
NPM has many commands an options you can use but knowing just a handfull of commands will do for your day to day WordPress theme development. I have listed the most important commands below:
Install an NPM package:
$ npm install package_name --save
Install Multiple NPM packages at once:
$ npm install package_name_one package_name_two --save
Install an NPM package for development use only:
$ npm install package_name --save-dev
Uninstall an NPM package:
$ npm uninstall package_name
Note: The — save and — save-dev flags in the command’s above will make NPM list the installed package in your package.json file within the “dependencies” or “devDependencies” fields. Files listed in the dependencies field are packages that your project needs to run. As an example your project’s code may depend on jQuery, so it should be saved to the dependencies field with the — save flag. Laravel Mix on the other hand is a package we only need on our local machine to bundle our assets, so it should be saved to the devDependencies field with the — save-dev flag. More on this can be found in this article: “NPMmmm #1: Dev Dependencies, Dependencies” by Dylan Avery.
Now that we know how to install and remove NPM packages we can install Laravel Mix to start bundeling our assets.
Laravel Mix in WordPress theme development:
The Laravel Mix website states to be “An elegant wrapper around Webpack for the 80% use case”. Meaning that in most cases you can have all the power you need from Webpack with just a liitle bit of setup. Laravel Mix makes it realy easy to configure a Webpack setup for your project by providing a easy to understand Api.
We are going to use Laravel Mix to create a Webpack setup for our WordPress theme development. But ofcourse we need to install it into our project first.
Installing Laravel Mix with NPM:
You can install Laravel Mix with NPM, which we just intalled and initialized for our project.
Now the Laravel Mix website say’s you only need to install the laravel-mix package from NPM, but in reality that’s not the case. You are going to need two more packages, Sass and Sass-loader for Laravel Mix to actualy work.
To install these packages cd into your WordPress themes folder, if needed, and run the following commands:
$ cd path/to/your/themefolder
$ npm install laravel-mix --save-dev
$ npm install sass --save-dev
$ npm install sass-loader --save-dev
NOTE: You can save some time by installing these three packages at once by listing them in your npm install command like bellow. This will install al three packages in one go.
$ npm install laravel-mix sass sass-loader --save-dev
When ready open up your package.json file and note that NPM listed these three packages within the devDependencies field like I explained before.
NOTE: If you look at your files you’l notice that NPM has created a folder called node_modules in the root of your theme where it stores the files of your installed packages. If you are using Git to version control your WordPress theme you will want to add this folder to your .gitignore file.
Now that we have Laravel Mix installed we have to create a configuration file called webpack.mix.js. This file will hold our custom configuration.
Configuring webpack.mix.js:
A core concept of using Laravel Mix, or any other bundler, is that we have a source and an output. Meaning that we write our code in a source file/folder and the bundler creates processed/bundled/minified files as it’s output that we can reference in our WordPress theme.
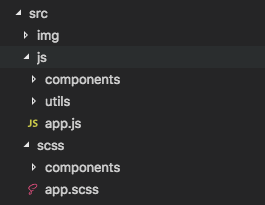
If you have a look at the files of our example theme you’l notice that we have a src directory, and inside it we have subfolders for scss, img and js to organize our code.The js and scss directories contain a app.js and app.scss respectivaly which will serve as our entry-points (sources) for Laravel Mix.
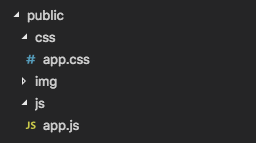
We also have a public folder which has the same structure as our src folder with one small diffrense being in the public folder we have a css subfolder instead of a scss folder because we are going to bundle our .scss files to .css files so that all browsers can handle them. The public folder serves as out output folder. The files in this folder will be added to the theme.
Now to configure Laravel Mix to meet our custom file structure we have to create a file called webpack.mix.js in the root of our WordPress theme folder and copy & paste the following code:
With this configuration we import Laravel Mix and chain four functions to the Mix object and tell Webpack to do the following:
- .js() Find a file called app.js within the src/js folder, bundle it and place the output in a file called app.js within the public/js folder.
- .sass() Find a file called app.scss within the src/scss folder, bundle it and place the output in a file called app.css within the public/css folder.
- .copyDirectory() Find a folder called src/img and copy it to the public folder.
- .options() Tell webpack not to change any urls in our css.
With this webpack.mix.js file we now have a working configuration for Laravel Mix that we could start using.
NOTE: Laravel Mix has a lot more options then shown in this example which you can read up on in the laravel mix documentation. But for now we have al we need to start using it.
Now we need a way to run Laravel Mix so it can do it’s magic.
Configuring package.json to run Laravel Mix.
To run Laravel Mix with our custom configuration you could run the following command in your Cli. But remembering this command or copy pasting it each time we need it is not realy a workable solution.
Luckaly we created a package.json file before which has the option of creating NPM command shortcuts within a scripts object like shown below
Copy lines 14 till 20 below and add them to your package.json file:
With these scripts added to our package.json file we now have three handy commands we can use to work with Laravel Mix.
$ npm run dev
This command will process and bundle our files for development use.
$ npm run watch
This command will de the same as npm run dev but will keep running and watch for file changes. If any of our files changes it will automaticaly process and bundle our files again.
NOTE: To stop the npm run watch process you can type ctrl + c in your terminal window.
$ npm run production
This command will process, bundle and minify our files for use in production a.k.a your live website.
To test our setup run the npm run dev command listed above, and if all goes well you should be presented with a list of files that were processed. If not, most errors that accour will have something to do with a wrong file path. You can scroll to the top of the error message and it will likely tell you it can’t find a certain file. Or you can referense the Example theme.
Sass/Scss in WordPress theme development:
Sass hase many options that will help you write better css and structure your codebase to be more maintainable. You can find all the options within the Sass documentiation. But i will give you some basic examples to show you how to better structure your css.
NOTE: Sass comes in two flavours. Sass and Scss. De difrence between these two is the file extentions and the syntax used. Now i personaly like the Scss flavour, so i’m gonne use that for these examples. The documentation will always list both so you can choose wich one you like best. If you want to use the sass version, change your file names to have the .sass file extention.
Importing files:
One
of the most usefull features of Sass is the fact that you can split
your code into several files, and then import these files into your
Bundlers entry point.
In the example WordPress theme we use src/scss/app.scss as our entry point for Laravel Mix (See the webpack.mix.js file), We only use this file to import other .scss files so that Laravel Mix bundles these into our output app.css file.
In the example Above we:
- Import four files that come from an NPM package called “purecss”. Packages from NPM are located within the node_modules folder, hence we start our url’s with the ~ character which is a shortcut to the node_modules fiolder.
- We import a external Google fonts css file. Note that these files are not included in our output bundle, but our downloaded by the browser.
- We import a custom scss file from within a components folder called html-body.scss.
If you have a look at the example theme you’l notice a components folder within the src/scss folder. You are free to make up your own file structure, but as an example i use this folder to store scss files for each of my webpage compomnents.
So if i have a slider at the top of my webpage is will create a file slider.scss in my components folder. Put all css related to that slider there, and import it into my app.scss entry point. I’ll repeat these steps for all other sections of my webpage.
Nesting selectors:
Below
is an example on nesting css selectors. Meaning that one selector/group
can contain other selectors. The Sass compiler within Laravel Mix will
process this syntax and output normal css from this code.
The code above will output css for the nav, nav ul, nav ul li and nau ul li a as you would find in normal css.
Variables:
Sass also makes it possible to create variables within your code. Below is a simple example, but i would recommend you create a seperate variables.scss files, as shown in src/scss/common/variables.scss in the example WordPress theme. and import that at the top of your app.scss entry point. You can then access these variables from any other imported .scss file.
This is just a fraction of the usefull things Sass brings to css development. I highly recommend you take a look at the Saas documentation for other stuff like Mixins and Inheritance.
ES6 Modules in WordPress theme development:
ES6 Modules are a great way to organize your WordPress theme’s javascript code. And to prevent nasty spaghetti code files.
Chris Coyier has a great article over at Css-Tricks.com: “How Do You Structure JavaScript? The Module Pattern Edition” that explains the use of Modules in-depth. But i’ll give a small example below.
The basic principle is to create seperate files for diffrent sections of your site. So to continue the example i gave earlier, if i have a slider at the top of my site i will create a file called slider.js in the src/js/components/slider folder. In the slider.js file i will create a object called Slider and add my code to that object. At the end of the file i will export the object as a module.
In my app.js entry point file i will import the Slider object/module and initialize it at Dom Ready.
Have a look at the example below:
Here we create a javascript object called Example which holds three functions. At the end of the file we export this Example object as a Module with export default Example.
We can now import the module we just created with import Example from ‘./components/example.js’ as shown in the app.js file below. After we have imported it we call the modules init() function at Dom Ready.
NOTE: In the code above you can see that i’m using a arrow function as the callback for $().ready( () =>{} ). Arrow functions are not supported by all browsers, but i can use it here anyway becouse Laravel Mix (Using Babel) will convert this back to plain javascript that all browsers can understand. So you see you can start using modern javascript syntaxt now becouse of Laravel Mix and Webpack.
You can repeat these steps and create more modules for other parts of your website and import these into your app.js entry point as well as shown below:
Importing NPM Packages within your javascript:
Since we have NPM up and running for our WordPress theme we could also use it to add other javascript libraries to out code.
For example. let’s say you want to use the moment.js library in your code. You could add a new scripts tag to your page, or enqueuue it properly from within your functions.php or you could now simply run the following command:
$ npm install moment --save
This will download and add moment.js to your project (and package.json file). And you can now use it in a module like shown below:
I hope that these examples make sense and show how you can better organize and code your WordPress theme’s css and javascript.
All done!?
If you have a configuration that you are happy with and want to use it in another project, you dont have to repeat all these steps. Just copy your package.json and webpack.mix.js files to your new project. Adjust them to meet your needs and run npm install. which will make NPM install all packages listed in your package.json file.
This is also true if you share your code with others, directly or via Github. You don’t have to share all the packages, just the package.json file. Someone else can just run npm install, and NPM will download all the packages again.
You can find a basic WordPress theme with the configurations mentioned above in this Github repository.
I hope you liked this article and found something that will help you make better WordPress themes.
I know we only covered the basics here. I will be publishing an additional article with some more in-depth Laravel Mix options soon. So stay tuned. Clap for this article and follow me on Twitter: Vanaf1979 or Facebook: Vanaf1979.
Happy Theming…